ONLYOFFICE Document Viewer
You can use ONLYOFFICE Document Viewer to open and navigate through PDF, XPS, DjVu files.
ONLYOFFICE Document Viewer allows to:
- view PDF, XPS, DjVu files,
- add annotations using chat tool,
- navigate files using contents navigation panel and page thumbnails,
- use select and hand tools,
- print and download files,
- use internal and external links,
-
access advanced settings of the editor and view the following document info using the File tab or the View settings button:
- Location (available in the online version only) - the folder in the Documents module where the file is stored.
- Owner (available in the online version only) - the name of the user who has created the file.
- Uploaded (available in the online version only) - the date and time when the file has been uploaded to the portal.
- Statistics - the number of pages, paragraphs, words, symbols, symbols with spaces.
- Page size - the dimensions of the pages in the file.
- Last Modified - the date and time when the document was last modified.
- Created - the date and time when the document was created.
- Application - the application the document has been created with.
- Author - the person who has created the document.
- PDF Producer - the application used to convert the document to PDF.
- PDF Version - the version of the PDF file.
- Tagged PDF - shows if PDF file contains tags.
- Fast Web View - shows if the Fast Web View has been enabled for the document.
- use plugins
- Plugins available in the desktop version: Translator, Send, Thesaurus.
- Plugins available in the online version: Controls example, Get and paste html, Telegram, Typograf, Count word, Speech, Thesaurus, Translator.
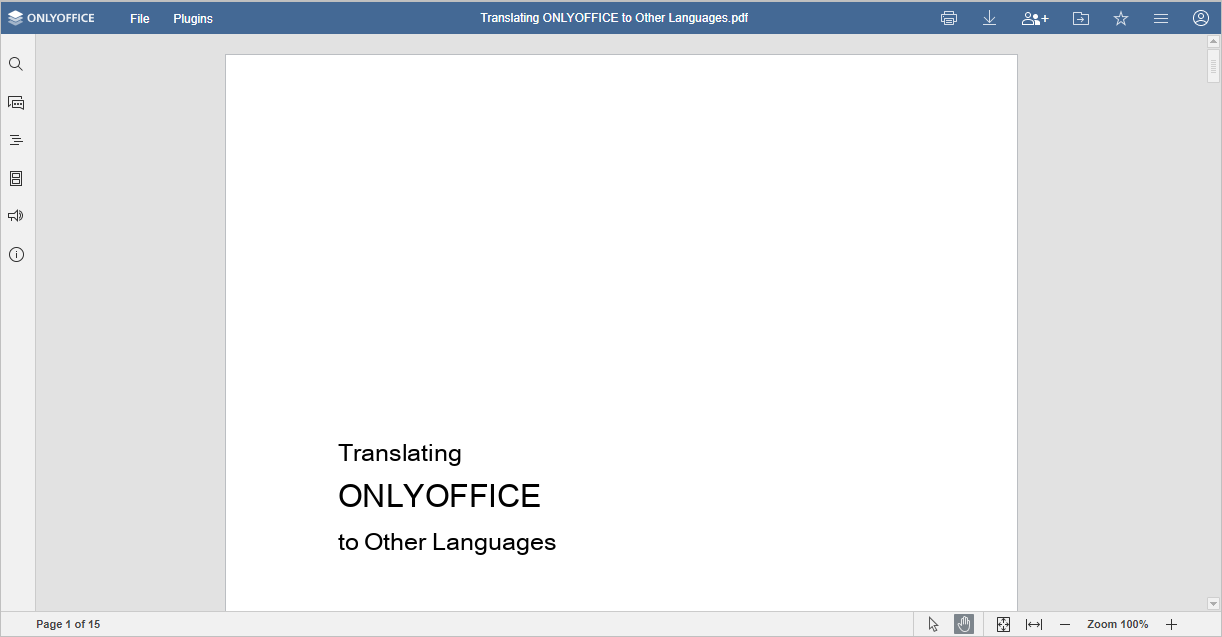
ONLYOFFICE Document Viewer interface:

-
The Top toolbar provides access to File and Plugins tabs, and the following icons:
Print allows to print out the file;
Download allows to download a file to your computer;
Manage document access rights (available in the online version only) allows you to manage the users who have access to the file right from the document: invite new users giving them permissions to edit, read, comment, fill forms or review the document, or deny some users access rights to the file.
Open file location in the desktop version allows opening the folder, where the file is stored, in the File explorer window. In the online version, it allows opening the folder of the Documents module, where the file is stored, in a new browser tab;
Mark as favorite / Remove from favorites (available in the online version only) click the empty star to add a file to favorites as to make it easy to find, or click the filled star to remove the file from favorites. The added file is just a shortcut so the file itself remains stored in its original location. Deleting a file from favorites does not remove the file from its original location;
View settings allows adjusting the View Settings and access the Advanced Settings of the editor;
User displays the user’s name when you hover the mouse over it.
- The Status bar located at the bottom of the ONLYOFFICE Document Viewer window indicates the page number and displays the background status notifications. It also contains the following tools:
Selection tool allows to select text in a file.
Hand tool allows to drag and scroll the page.
Fit to page allows to resize the page so that the screen displays the whole page.
Fit to width allows to resize the page so that the page scales to fit the width of the screen.
 Zoom adjusting tool allows to zoom in and zoom out the page.
 -
The Left sidebar contains the following icons:
- - allows to use the Search and Replace tool,
- - (available in the online version only) allows opening the Chat panel,
-
- allows to open the Navigation panel that displays the list of all headings with corresponding nesting levels. Click the heading to jump directly to a specific page.

Right-click the heading on the list and use one of the available options from the menu:
- Expand all - to expand all levels of headings at the Navigation panel.
- Collapse all - to collapse all levels of headings, excepting level 1, at the Navigation panel.
- Expand to level - to expand the heading structure to the selected level. E.g. if you select level 3, then levels 1, 2 and 3 will be expanded, while level 4 and all lower levels will be collapsed.
To manually expand or collapse separate heading levels, use the arrows to the left of the headings.
To close the Navigation panel, click the Navigation icon on the left sidebar once again.
-
- allows to display page thumbnails for quick navigation. Click on the Page Thumbnails panel to access the Thumbnails Settings:

- Drag the slider to set the thumbnail size,
- The Highlight visible part of page is active by default to indicate the area that is currently on screen. Click it to disable.
To close the Page Thumbnails panel, click the Page Thumbnails icon on the left sidebar once again.
- - allows to contact our support team,
- - (available in the online version only) allows to view the information about the program.