Insert and adjust images
In Presentation Editor, you can insert images in the most popular formats into your presentation. The following image formats are supported: BMP, GIF, JPEG, JPG, PNG.
To add an image on a slide,
- in the slide list on the left, select the slide you want to add the image to,
- click the Insert Image
 icon at the top toolbar,
 - select one of the following options to load the image:
- the Picture from File option will open the standard Windows dialog window for file selection. Browse your computer hard disk drive for the necessary file and click the Open button
- the Picture from URL option will open the window where you can enter the necessary image web address and click the OK button
- once the image is added you can change its size and position.

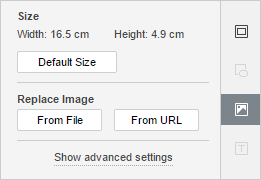
The right sidebar is activated when you left-click an image and choose the Image Settings ![]() icon on the right. It contains the following sections:
icon on the right. It contains the following sections:
Size - is used to view the current image Width and Height or restore the image Default Size if necessary.
Replace Image - is used to load another image instead of the current one selecting the desired source. You can select one of the options: From File or From URL.
To change the advanced settings of the image, right-click the image and select the Image Advanced Settings option from the contextual menu or left-click the image and press the Show advanced settings link at the right sidebar. The image properties window will be opened:

Here you can set the following image properties:
- Size - use this option to change the image width and/or height. If the Constant Proportions
 button is clicked (in this case it looks like this
  ), the width and height will be changed together preserving the original image aspect ratio. To restore the default size of the added image, click the Default Size button.
 - Position - use this option to change the image position on the slide (the position is calculated from the top and the left side of the slide).
To delete the inserted image, left-click it and press the Delete key on the keyboard.
To learn how to align an image on the slide or arrange several images, refer to the Align and arrange objects on a slide section.