Set slide parameters
To customize your presentation, you can select a theme, color scheme, slide size and orientation for the entire presentation, change the background fill or slide layout for each separate slide, apply transitions between the slides. It's also possible to add explanatory notes to each slide that can be helpful when demonstrating the presentation in the Presenter mode.
-
Themes allow you to quickly change the presentation design, notably the slides background appearance, predefined fonts for titles and texts and the color scheme that is used for the presentation elements.
To select a theme for the presentation, click on the necessary predefined theme from the themes gallery on the right side of the top toolbar Home tab. The selected theme will be applied to all the slides if you have not previously selected certain slides to apply the theme to.

To change the selected theme for one or more slides, you can right-click the selected slides in the list on the left (or right-click a slide in the editing area), select the Change Theme option from the contextual menu and choose the necessary theme.
-
Color Schemes affect the predefined colors used for the presentation elements (fonts, lines, fills etc.) and allow you to maintain color consistency throughout the entire presentation.
To change a color scheme, click the
 Change color scheme icon at the Home tab of the top toolbar and select the necessary scheme from the drop-down list. The selected color scheme will be highlighted in the list and applied to all the slides.

-
To change a slide size for all the slides in the presentation, click the
 Select slide size icon at the Home tab of the top toolbar and select the necessary option from the drop-down list. You can select:
- one of the two quick-access presets - Standard (4:3) or Widescreen (16:9),
-
the Advanced Settings option that opens the Slide Size Settings window where you can select one of the available presets or set a Custom size specifying the desired Width and Height values.

The available presets are: Standard (4:3), Widescreen (16:9), Widescreen (16:10), Letter Paper (8.5x11 in), Ledger Paper (11x17 in), A3 Paper (297x420 mm), A4 Paper (210x297 mm), B4 (ICO) Paper (250x353 mm), B5 (ICO) Paper (176x250 mm), 35 mm Slides, Overhead, Banner.
The Slide Orientation menu allows to change the currently selected orientation type. The default orientation type is Landscape that can be switched to Portrait.
-
To change a background fill:
- in the slide list on the left, select the slides you want to apply the fill to. Or click at any blank space within the currently edited slide in the slide editing area to change the fill type for this separate slide.
-
at the Slide settings tab of the right sidebar, select the necessary option:
- Color Fill - select this option to specify the solid color you want to apply to the selected slides.
- Gradient Fill - select this option to fill the slide with two colors which smoothly change from one to another.
- Picture or Texture - select this option to use an image or a predefined texture as the slide background.
- Pattern - select this option to fill the slide with a two-colored design composed of regularly repeated elements.
- No Fill - select this option if you don't want to use any fill.
For more detailed information on these options please refer to the Fill objects and select colors section.
-
Transitions help make your presentation more dynamic and keep your audience's attention. To apply a transition:
- in the slide list on the left, select the slides you want to apply a transition to,
-
choose a transition in the Effect drop-down list on the Slide settings tab,
Note: to open the Slide settings tab you can click the Slide settings
 icon on the right or right-click the slide in the slide editing area and select the Slide Settings option from the contextual menu.
 - adjust the transition properties: choose a transition variation, duration and the way to advance slides,
-
click the Apply to All Slides button if you want to apply the same transition to all slides in the presentation.
For more detailed information on these options please refer to the Apply transitions section.
-
To change a slide layout:
- in the slide list on the left, select the slides you want to apply a new layout to,
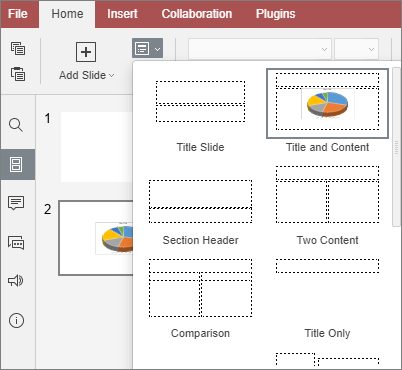
- click the
 Change slide layout icon at the Home tab of the top toolbar,
 -
select the necessary layout from the menu.
Alternatively, you can right-click the necessary slide in the list on the left or in the editing area, select the Change Layout option from the contextual menu and choose the necessary layout.
Note: currently, the following layouts are available: Title Slide, Title and Content, Section Header, Two Content, Comparison, Title Only, Blank, Content with Caption, Picture with Caption, Title and Vertical Text, Vertical Title and Text.
-
To add objects to a slide layout:
- click the Change slide layout
 icon and select a layout you want to add an object to,
 -
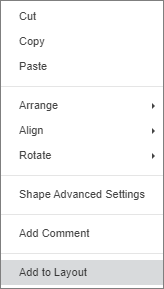
using the Insert tab of the top toolbar, add the necessary object to the slide (image, table, chart, shape), then right-click on this object and select Add to Layout option,

-
at the Home tab click Change slide layout
 and apply the changed layout.

Selected objects will be added to the current theme's layout.
Note: objects placed on a slide this way cannot be selected, resized, or moved.
- click the Change slide layout
-
To return the slide layout to its original state:
- in the slide list on the left, select the slides that you want to return to the default state,
- right-click on one of the slides and select the Reset slide option in the context menu,
Note: hold down the Ctrl key and select one slide at a time to select several slides at once, or hold down the Shift key to select all slides from the current to the selected.
All text frames and objects located on slides will be reset and situated in accordinance with the slide layout.
-
To add notes to a slide:
- in the slide list on the left, select the slide you want to add a note to,
- click the Click to add notes caption below the slide editing area,
-
type in the text of your note.
Note: you can format the text using the icons at the Home tab of the top toolbar.
When you start the slideshow in the Presenter mode, you will be able to see all the slide notes below the slide preview area.